
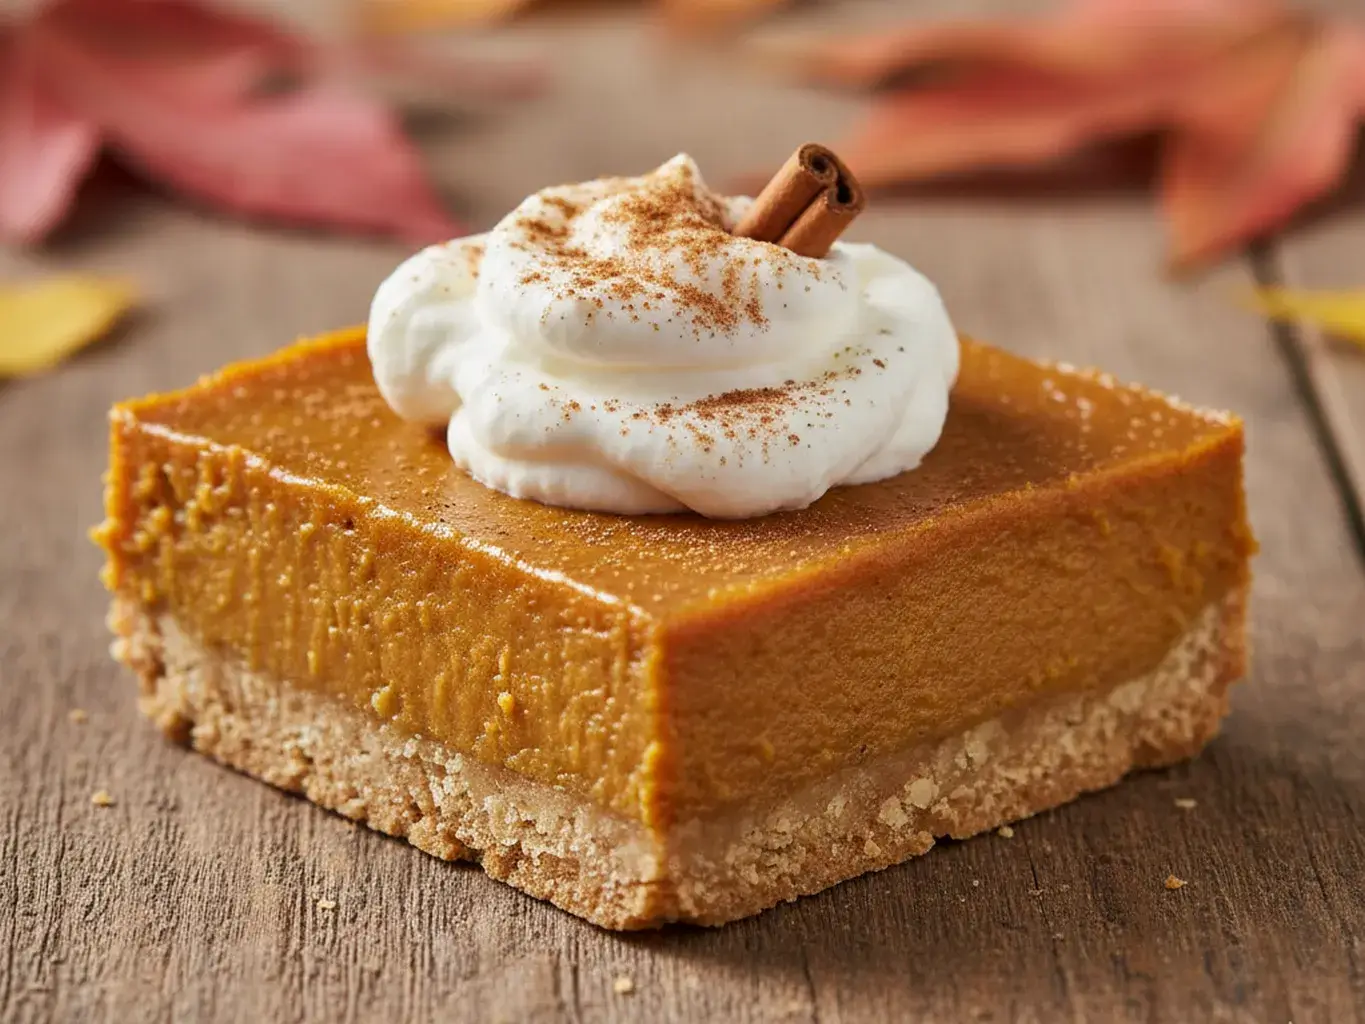
Gluten-Free Pumpkin Pie Bars. Just saying those words feels like a warm, cozy hug, doesn’t it? Imagine all the spiced, creamy, delicious flavor of your favorite autumn dessert, but in a simple, no-fuss bar form with a gluten-free shortbread crust that’s downright magical. Whether you’re hosting a holiday gathering, need a treat for the school bake sale (that everyone can enjoy!), or just want to make your kitchen smell incredible, this recipe is your answer. It’s quick, easy, and guaranteed to become a seasonal staple in your home.
WHY MAKE Gluten-Free Pumpkin Pie Bars
- Forgiving and Deceptive Nature: The Gluten-Free Pumpkin Pie Bars are highly adaptable and easy to execute successfully. Most notably, the bars are so delicious that their gluten-free quality is undetectable, making them appealing to all eaters, regardless of dietary preference.
- Simplified Crust Preparation: The crust is a significant advantage, as it comes together quickly in minutes and eliminates the need for complicated, time-consuming steps like rolling out dough, making the process accessible even for novice bakers.
- Ideal Make-Ahead Convenience: These bars function as the ultimate prepared dessert. The process of baking them and allowing them to set overnight means a flawless, impressive dessert is ready and waiting, eliminating day-of stress for any event.
- Universal Crowd-Pleasing Appeal: They are guaranteed to be a hit with a diverse group. They specifically cater to critical dietary restrictions like celiac disease or gluten sensitivity without being a compromise, ensuring everyone can enjoy the same delicious dessert.
- Uncompromised Flavor Experience: The ultimate benefit is that the dessert sacrifices nothing in terms of taste and satisfaction. Every guest, regardless of their dietary needs, gets to enjoy the full, classic flavor of a pumpkin pie.
Gluten-Free Pumpkin Pie Bars
- Total Time: 55 minutes
- Yield: 16 bars 1x
Description
Creamy, spiced pumpkin pie filling baked over a gluten-free oat and almond flour crust — a simple and delicious twist on classic pumpkin pie in bar form.
Ingredients
- For the crust:
- 1 1/2 cups gluten-free rolled oats
- 1 cup almond flour
- 1/3 cup brown sugar
- 1/2 teaspoon cinnamon
- 1/4 teaspoon salt
- 1/2 cup melted coconut oil or unsalted butter
- For the filling:
- 1 (15 oz) can pumpkin puree
- 2/3 cup brown sugar
- 2 large eggs
- 1 teaspoon vanilla extract
- 1 1/2 teaspoons pumpkin pie spice
- 1/2 teaspoon cinnamon
- 1/4 teaspoon salt
- 3/4 cup evaporated milk (or full-fat coconut milk)
Instructions
- 1. Preheat oven to 350°F (175°C). Line a 9×9-inch baking pan with parchment paper.
- 2. In a medium bowl, combine oats, almond flour, brown sugar, cinnamon, salt, and melted coconut oil. Stir until crumbly.
- 3. Press mixture evenly into prepared pan. Bake crust for 10 minutes.
- 4. Meanwhile, whisk pumpkin puree, brown sugar, eggs, vanilla, pumpkin pie spice, cinnamon, salt, and evaporated milk until smooth.
- 5. Pour filling over partially baked crust and spread evenly.
- 6. Bake 35–40 minutes, or until center is set and slightly firm.
- 7. Cool completely in pan before slicing into bars.
- 8. Refrigerate for at least 1 hour for cleaner cuts and best texture.
Notes
- Top bars with whipped cream or a sprinkle of cinnamon before serving.
- Store leftovers covered in the refrigerator for up to 5 days.
- These bars can also be frozen — thaw overnight in the fridge before serving.
- Prep Time: 15 minutes
- Cook Time: 40 minutes
- Category: Dessert
- Method: Baking
- Cuisine: American
Nutrition
- Serving Size: 1 bar
- Calories: 180
- Sugar: 13g
- Sodium: 90mg
- Fat: 9g
- Saturated Fat: 4g
- Unsaturated Fat: 4g
- Trans Fat: 0g
- Carbohydrates: 20g
- Fiber: 2g
- Protein: 4g
- Cholesterol: 30mg
Keywords: pumpkin pie bars, gluten-free pumpkin dessert, fall baking, Thanksgiving
HOW TO MAKE GLUTEN-FREE PUMPKIN PIE BARS
These Gluten-Free Pumpkin Pie Bars are beautifully straightforward, broken down into two main parts: the press-in crust and the velvety pumpkin filling. You simply mix, pour, and bake. Let’s walk through it.
INGREDIENTS
For the Gluten-Free Crust:
- 2 cups gluten-free 1-to-1 baking flour (like Bob’s Red Mill or King Arthur)
- 1/2 cup granulated sugar
- 1/2 teaspoon salt
- 1 cup (2 sticks) cold unsalted butter, cubed

For the Pumpkin Filling:
- 1 (15 oz) can pure pumpkin puree (not pumpkin pie filling)
- 3 large eggs
- 1 cup packed light brown sugar
- 1 tablespoon pumpkin pie spice
- 1/2 teaspoon salt
- 1 teaspoon pure vanilla extract
- 1/2 cup canned full-fat coconut milk or heavy cream
DIRECTIONS GLUTEN-FREE PUMPKIN PIE BARS
- Preheat and Prepare: Begin by preheating your oven to 350°F (175°C). Then, line a 9×13 inch baking pan with parchment paper, leaving some overhang on the sides. This will make lifting the bars out for slicing incredibly easy later.
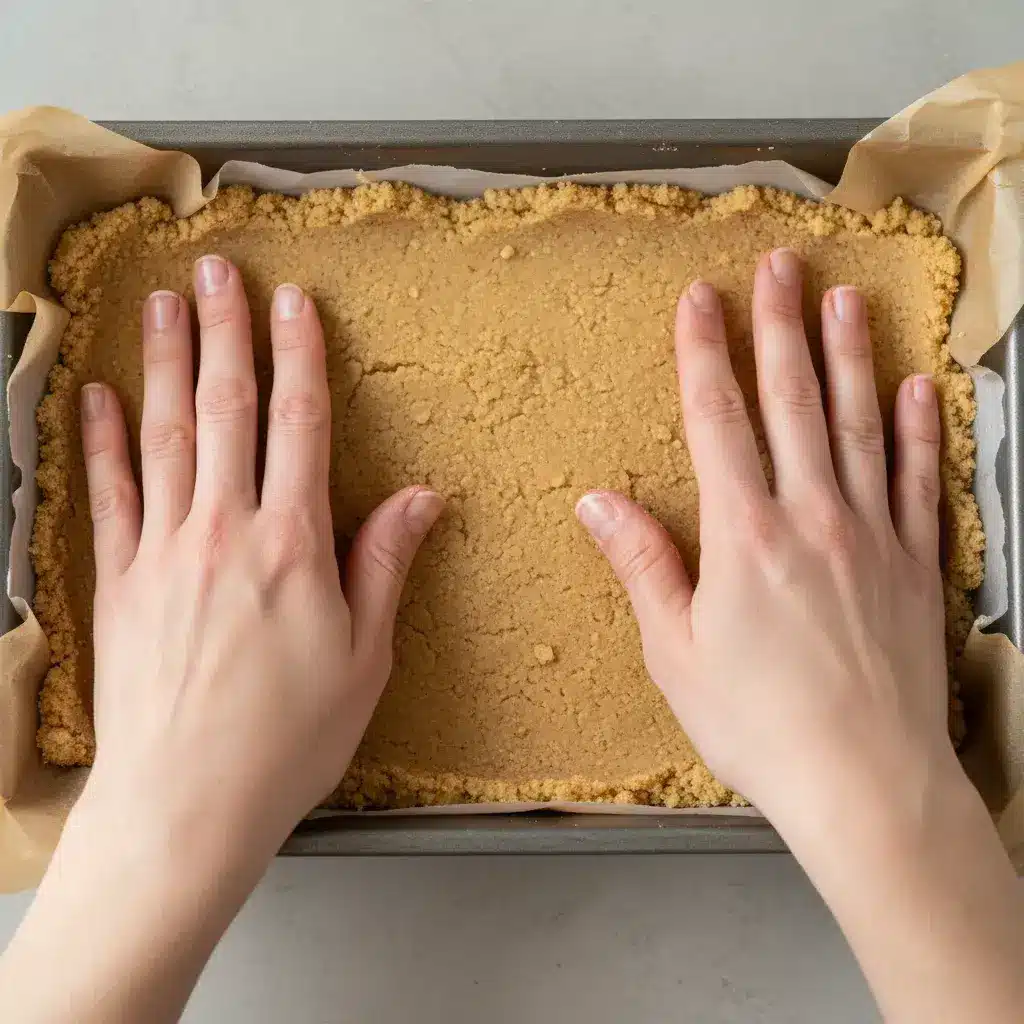
- Make the Crust: In a food processor, pulse together the gluten-free flour, granulated sugar, and salt. Alternatively, you can whisk these dry ingredients in a large bowl. Add the cold, cubed butter. Pulse (or use a pastry cutter) until the mixture resembles coarse, wet sand and starts to clump together.
- Press the Crust: Dump the crust mixture into your prepared pan. Using your fingers or the flat bottom of a measuring cup, press the dough firmly and evenly into the bottom of the pan. You want a solid, compact layer.
- Par-Bake: Place the crust in the preheated oven and bake for 15 minutes. It should look slightly puffed and dry. Remove it from the oven and set it aside while you make the filling. Keep the oven on.
- Whisk the Filling: In a large bowl, whisk the eggs and brown sugar together until smooth and well combined. Add the pumpkin puree, pumpkin pie spice, salt, and vanilla. Whisk until everything is perfectly blended and smooth.
- Add the Cream: Gently stream in the coconut milk or heavy cream while whisking continuously. Keep whisking until the filling is silky and uniform in color.
- Assemble and Bake: Carefully pour the pumpkin filling over the warm pre-baked crust. Use a spatula to spread it into an even layer.
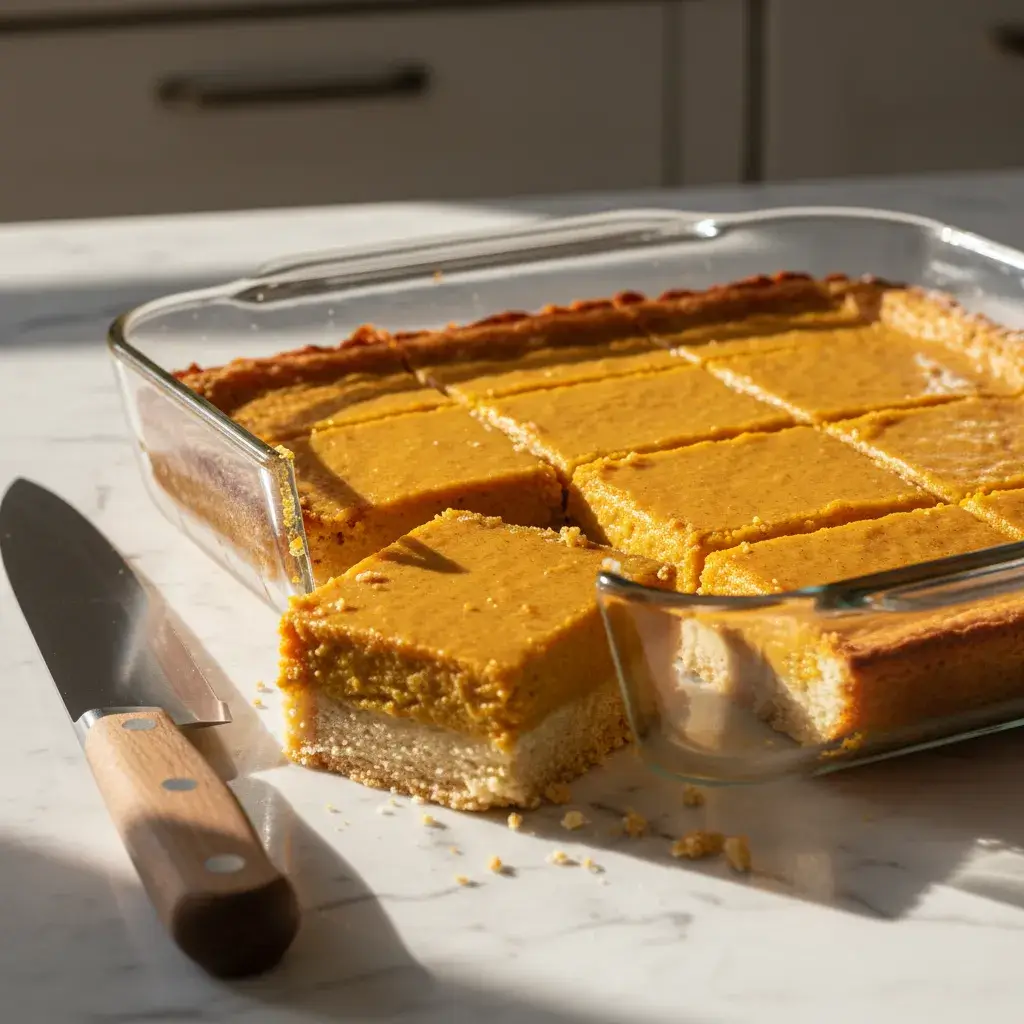
- Bake to Perfection: Return the pan to the oven and bake for 30-35 minutes. The edges of the filling will look set, but the center should still have a slight jiggle when you gently shake the pan. This is key for a creamy, not rubbery, texture.
- Cool Completely: Place the pan on a wire rack and allow the bars to cool completely to room temperature. This is a crucial step! Then, for the best clean slices, cover the pan and refrigerate for at least 4 hours, or preferably overnight, to allow the filling to set completely.
NUTRITION AND HEALTH CONSIDERATIONS
| Aspect | Details |
|---|---|
| Primary Dietary Feature | A safe, gluten-free dessert option when made with a certified gluten-free flour blend, suitable for those with celiac disease or gluten intolerance. |
| Adaptability & Inclusivity | The recipe is highly adaptable; using a dairy-free butter alternative can easily make the entire dessert dairy-free, catering to more dietary needs. |
| Ingredient Quality & Nutrition | Made with real, whole ingredients. Pumpkin puree provides notable nutritional value, being a great source of Vitamin A and fiber. |
| Placement in a Diet | While it is a dessert containing sugar, it is designed to be enjoyed mindfully as a treat within the context of a balanced diet. |
HOW TO SERVE GLUTEN-FREE PUMPKIN PIE BARS
- Clean Removal Technique: The key to pristine bars is using the parchment paper overhang as a sling to lift the entire baked slab effortlessly and intact from the pan onto a cutting board, preventing any damage to the edges or crust.
- Precise Slicing Instructions: For uniform serving sizes, slice the full slab into 12 to 16 individual squares on a stable surface. Using a sharp knife and cleaning it between cuts will yield the cleanest edges.
- Essential Creamy Element: Elevate the dessert instantly by pairing each bar with a generous dollop of either classic whipped cream or a dairy-free alternative like coconut whipped cream, adding a luxurious and complementary creamy texture.
- Garnish for Texture and Flavor: A final garnish, such as a light dusting of cinnamon or a few toasted pecans, is recommended to provide visual appeal, an attractive texture contrast, and an enhanced, sophisticated flavor profile.
- Ideal Beverage Pairing: The bars are presented as the perfect accompaniment to a hot cup of coffee or tea, as the bitterness of the drink creates an ideal flavor balance against the sweet and spiced notes of the dessert.
HOW TO STORE
Store any leftover Gluten-Free Pumpkin Pie Bars in an airtight container in the refrigerator for up to 5 days. You can also freeze them for longer storage! Arrange the cooled, cut bars in a single layer on a parchment-lined baking sheet and freeze until solid. Then, transfer the frozen bars to a freezer-safe bag or container. They will keep for up to 3 months. Thaw in the refrigerator overnight before serving.
TIPS TO MAKE THE BEST GLUTEN-FREE PUMPKIN PIE BARS
TIPS AND NOTES: YOUR KITCHEN COMPANION
- Crust Consistency: The crust should feel like damp sand and hold together when you pinch it. If it seems too dry, add a teaspoon of ice water at a time until it comes together.
- Room Temperature Ingredients: For the smoothest filling, ensure your eggs and coconut milk/cream are not straight from the fridge. Let them sit out for 15-20 minutes before you begin.
- Don’t Overbake: The jiggle test is your best friend. The bars will continue to set as they cool. Overbaking can lead to a cracked surface and a less creamy texture.
- Chill Time is Key: Patience is a virtue here! Do not skip the chilling step. It makes all the difference for clean, perfect slices.
VARIATION
For a delightful twist, sprinkle a streusel topping over the pumpkin filling before baking. Simply combine 1/2 cup gluten-free oats, 1/4 cup brown sugar, 1/4 cup chopped pecans, and 2 tablespoons of melted butter. Sprinkle it over the filling and bake as directed.
GLUTEN-FREE PUMPKIN PIE BARS FAQs
What is the secret to good pumpkin bars?
The secret is a perfectly balanced spice blend and, most importantly, not overbaking them. Taking them out of the oven while the center still has a slight jiggle ensures a custardy, creamy texture instead of a dry, cakey one.
Is pumpkin celiac friendly?
Yes, pure, plain pumpkin puree (100% pumpkin) is naturally gluten-free. The main concern is always cross-contamination or added ingredients in pre-made pie fillings, so always check the label to be safe.
Are Quest pumpkin pie bars gluten-free?
According to Quest Nutrition, their pumpkin pie bars are certified gluten-free, making them a great store-bought option for a quick protein snack.
Does pumpkin pie contain gluten?
Traditional pumpkin pie can contain gluten in its crust, which is typically made with wheat flour. The filling is usually gluten-free, but again, you must be cautious of thickeners or pre-made mixes. This recipe eliminates all worry with its gluten-free crust!
CONCLUSION
There you have it! The ultimate recipe for Gluten-Free Pumpkin Pie Bars that are sure to impress. They are everything you love about fall, baked into one easy, shareable pan. So preheat that oven, grab your can of pumpkin, and get ready to fill your home with the most wonderful aroma. Happy baking!